Arduino – Week 4 – Robot

The final week task was to program a robot which would move by itself and avoid objects

Unfortunately this wasn’t completed due to time constraints, although most of the code for the movements was completed and fully working

The board was attached to the chassis with metal standoff – which did short the board out – however it was sorted out by replacing them with plastic ones

Two stepper motors were used to control the robot, one on each side.

There is a breakout board on top of the arduino, which allows for easy plugging in and out of the stepper motors

Coding

Below is the coding used for the control

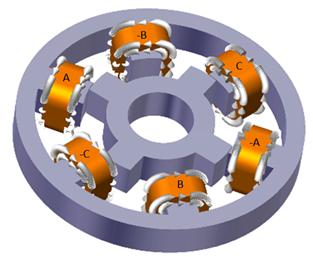
Where the breaks are for the left, right, forward, and reverse, the position of the output pins have been changed, so that the stepper motor activated the different magnets in a different order, which changes the direciton.

The left and right have one wheel going forward and one going backwards, therefore turning on the spot, similar to how tanks rotate using their tracks

Here the robot is programmed to run the command for about 16 seconds, after which it will stop moving

/*
  Stepper Motor lakelly 02/05/2019
*/

// the setup function runs once when you press reset or power the board
void setup() 
{
  // initialize digital coil A as an output.
  pinMode(10, OUTPUT);
    // initialize digital coil B as an output.
  pinMode(11, OUTPUT);
    // initialize digital coil C as an output.
  pinMode(12, OUTPUT);
    // initialize digital coil D as an output.
  pinMode(13, OUTPUT);
  //motor 2
  pinMode(6, OUTPUT);
    // initialize digital coil B as an output.
  pinMode(7, OUTPUT);
    // initialize digital coil C as an output.
  pinMode(8, OUTPUT);
    // initialize digital coil D as an output.
  pinMode(9, OUTPUT);

}

 int i=0;
  
void loop() {

   while(i < 1000){
  right();
  i++;

   }
}

void forward()    //+++++++++++++++++++++++++++++++++++++++++++++++FOWARDS++++++++++++++++++++++++++++++++++++++++++++++
{
      //STEP 1
  digitalWrite(10, HIGH);   
  digitalWrite(11, LOW);   
  digitalWrite(12, LOW);
  digitalWrite(13, HIGH);
  delay(2);                      // delay
      //STEP 2
  digitalWrite(10, HIGH);   
  digitalWrite(11, HIGH);   
  digitalWrite(12, LOW);
  digitalWrite(13, LOW);
    delay(2);                      // delay
      //STEP 3
  digitalWrite(10, LOW);   
  digitalWrite(11, HIGH);   
  digitalWrite(12, HIGH);
  digitalWrite(13, LOW);
    delay(2);                      // delay
      //STEP 4
  digitalWrite(10, LOW);   
  digitalWrite(11, LOW);   
  digitalWrite(12, HIGH);
  digitalWrite(13, HIGH);
    delay(2);                      // delay

//motor2
  //STEP 1
  digitalWrite(6, HIGH);   
  digitalWrite(7, LOW);   
  digitalWrite(8, LOW);
  digitalWrite(9, HIGH);
  delay(2);                      // delay
      //STEP 2
  digitalWrite(6, HIGH);   
  digitalWrite(7, HIGH);   
  digitalWrite(8, LOW);
  digitalWrite(9, LOW);
    delay(2);                      // delay
      //STEP 3
  digitalWrite(6, LOW);   
  digitalWrite(7, HIGH);   
  digitalWrite(8, HIGH);
  digitalWrite(9, LOW);
    delay(2);                      // delay
      //STEP 4
  digitalWrite(6, LOW);   
  digitalWrite(7, LOW);   
  digitalWrite(8, HIGH);
  digitalWrite(9, HIGH);
    delay(2);  // delay
}

void backward()    //+++++++++++++++++++++++++++++++++++++++++++++++BACKWARDS++++++++++++++++++++++++++++++++++++++++++++++
{
  //STEP 1
  digitalWrite(10, HIGH);   
  digitalWrite(11, LOW);   
  digitalWrite(12, LOW);
  digitalWrite(13, HIGH);
  delay(2);                      // delay
      //STEP 2
  digitalWrite(10, HIGH);   
  digitalWrite(11, HIGH);   
  digitalWrite(12, LOW);
  digitalWrite(13, LOW);
    delay(2);                      // delay
      //STEP 3
  digitalWrite(10, LOW);   
  digitalWrite(11, HIGH);   
  digitalWrite(12, HIGH);
  digitalWrite(13, LOW);
    delay(2);                      // delay
      //STEP 4
  digitalWrite(10, LOW);   
  digitalWrite(11, LOW);   
  digitalWrite(12, HIGH);
  digitalWrite(13, HIGH);
    delay(2);                      // delay


//motor2
  //STEP 1
  digitalWrite(9, HIGH);   
  digitalWrite(8, LOW);   
  digitalWrite(7, LOW);
  digitalWrite(6, HIGH);
  delay(2);                      // delay
      //STEP 2
  digitalWrite(9, HIGH);   
  digitalWrite(8, HIGH);   
  digitalWrite(7, LOW);
  digitalWrite(6, LOW);
    delay(2);                      // delay
      //STEP 3
  digitalWrite(9, LOW);   
  digitalWrite(8, HIGH);   
  digitalWrite(7, HIGH);
  digitalWrite(6, LOW);
    delay(2);                      // delay
      //STEP 4
  digitalWrite(9, LOW);   
  digitalWrite(8, LOW);   
  digitalWrite(7, HIGH);
  digitalWrite(6, HIGH);
    delay(2);                      // delay
}


void right()  //+++++++++++++++++++++++++++++++++++++++++++++++RIGHT++++++++++++++++++++++++++++++++++++++++++++++
{
   //STEP 1
  digitalWrite(13, HIGH);   
  digitalWrite(12, LOW);   
  digitalWrite(11, LOW);
  digitalWrite(10, HIGH);
  delay(2);                      // delay
      //STEP 2
  digitalWrite(13, HIGH);   
  digitalWrite(12, HIGH);   
  digitalWrite(11, LOW);
  digitalWrite(10, LOW);
    delay(2);                      // delay
      //STEP 3
  digitalWrite(13, LOW);   
  digitalWrite(12, HIGH);   
  digitalWrite(11, HIGH);
  digitalWrite(10, LOW);
    delay(2);                      // delay
      //STEP 4
  digitalWrite(13, LOW);   
  digitalWrite(12, LOW);   
  digitalWrite(11, HIGH);
  digitalWrite(10, HIGH);
    delay(2);                      // delay


//motor2
  //STEP 1
  digitalWrite(9, HIGH);   
  digitalWrite(8, LOW);   
  digitalWrite(7, LOW);
  digitalWrite(6, HIGH);
  delay(2);                      // delay
      //STEP 2
  digitalWrite(9, HIGH);   
  digitalWrite(8, HIGH);   
  digitalWrite(7, LOW);
  digitalWrite(6, LOW);
    delay(2);                      // delay
      //STEP 3
  digitalWrite(9, LOW);   
  digitalWrite(8, HIGH);   
  digitalWrite(7, HIGH);
  digitalWrite(6, LOW);
    delay(2);                      // delay
      //STEP 4
  digitalWrite(9, LOW);   
  digitalWrite(8, LOW);   
  digitalWrite(7, HIGH);
  digitalWrite(6, HIGH);
    delay(2);                      // delay
}


void left()   //+++++++++++++++++++++++++++++++++++++++++++++++left++++++++++++++++++++++++++++++++++++++++++++++
{
 //STEP 1
  digitalWrite(10, HIGH);   
  digitalWrite(11, LOW);   
  digitalWrite(12, LOW);
  digitalWrite(13, HIGH);
  delay(2);                      // delay
      //STEP 2
  digitalWrite(10, HIGH);   
  digitalWrite(11, HIGH);   
  digitalWrite(12, LOW);
  digitalWrite(13, LOW);
    delay(2);                      // delay
      //STEP 3
  digitalWrite(10, LOW);   
  digitalWrite(11, HIGH);   
  digitalWrite(12, HIGH);
  digitalWrite(13, LOW);
    delay(2);                      // delay
      //STEP 4
  digitalWrite(10, LOW);   
  digitalWrite(11, LOW);   
  digitalWrite(12, HIGH);
  digitalWrite(13, HIGH);
    delay(2);                      // delay


//motor2
  //STEP 1
  digitalWrite(6, HIGH);   
  digitalWrite(7, LOW);   
  digitalWrite(8, LOW);
  digitalWrite(9, HIGH);
  delay(2);                      // delay
      //STEP 2
  digitalWrite(6, HIGH);   
  digitalWrite(7, HIGH);   
  digitalWrite(8, LOW);
  digitalWrite(9, LOW);
    delay(2);                      // delay
      //STEP 3
  digitalWrite(6, LOW);   
  digitalWrite(7, HIGH);   
  digitalWrite(8, HIGH);
  digitalWrite(9, LOW);
    delay(2);                      // delay
      //STEP 4
  digitalWrite(6, LOW);   
  digitalWrite(7, LOW);   
  digitalWrite(8, HIGH);
  digitalWrite(9, HIGH);
    delay(2);                      // delay
}

Arduino – Week 3 – Displays and Ultrasonic sensors

Arduino LCD Displays

Wire up the arduino using these following instructions

  • VCC (Red) to 5V
  • Ground/GND (Black) to GND
  • SDA (Blue) to A4
  • SCL (Yellow) to A5

The code used was downloaded adn the library installed in the specific location. Ensure that the LCD drivers are included in the same folder

#include <Wire.h>  // Comes with Arduino IDE
// Get the LCD I2C Library here: 
// https://bitbucket.org/fmalpartida/new-liquidcrystal/downloads

#include <LiquidCrystal_I2C.h>

// set the LCD address to 0x27 for a 20 chars 4 line display
// Set the pins on the I2C chip used for LCD connections:
//                    addr, en,rw,rs,d4,d5,d6,d7,bl,blpol
LiquidCrystal_I2C lcd(0x27, 2, 1, 0, 4, 5, 6, 7, 3, POSITIVE);  // Set the LCD I2C address

void setup()   /*----( SETUP: RUNS ONCE )----*/
{
  Serial.begin(9600);  // Used to type in characters
  lcd.begin(20,4);         // initialize the lcd for 20 chars 4 lines, turn on backlight

  //-------- Write characters on the display ------------------
  // NOTE: Cursor Position: Lines and Characters start at 0  
  // lcd.setCursor(Horizontal position,Line) 
  
  lcd.setCursor(4,0); //Start at character 4 on line 0
  lcd.print("GO BACK");
  lcd.setCursor(4,1);  //Next start at character 6 on line 1
  lcd.print("TO");
  delay(1000);
  lcd.setCursor(4,2);
  lcd.print("THE");
  delay(1000);  
  lcd.setCursor(4,3);
  lcd.print("SHADOWS");
  
  delay(4000);
  // Wait and then tell user they can start the Serial Monitor and type in characters to
  // Display. (Set Serial Monitor option to "No Line Ending")
  lcd.setCursor(0,0); //Start at character 0 on line 0

  lcd.clear(); //Clears the screen.
  lcd.print("Start Serial Monitor");
  lcd.setCursor(0,1);
  lcd.print("Type characters");  
  lcd.setCursor(0,2);
  lcd.print("to display");  


}/*--(end setup )---*/


void loop()   /*----( LOOP: RUNS CONSTANTLY )----*/
{
  {
    // when characters arrive over the serial port...
    if (Serial.available()) {
      // wait a bit for the entire message to arrive
      delay(100);
      // clear the screen
      lcd.clear();
      // read all the available characters
      while (Serial.available() > 0) {
        // display each character to the LCD
        lcd.write(Serial.read());
      }
    }
  }

}/* --(end main loop )-- */


Displaying ultrasonic measurements on LCD screen

This is the code for running the screen and the ultrasound sensor all as the same time, displaying the range in cm to the LCD screen attached to the the arduino

It is a combination of both the ultrasonic sketch downloaded from student central and the above LCD sketch. The basics behind it is setting up the ultrasonic sensor as an input and keeping the LCD as an output

After some playing around to change the refresh rate (delay) of the LCD and where the stationary text was it looked good and could accurately read the distance if it was within its range

#include <Wire.h> // Comes with Arduino IDE
// Get the LCD I2C Library here:
// https://bitbucket.org/fmalpartida/new-liquidcrystal/downloads

#include <LiquidCrystal_I2C.h>

// set the LCD address to 0x27 for a 20 chars 4 line display
// Set the pins on the I2C chip used for LCD connections:
// addr, en,rw,rs,d4,d5,d6,d7,bl,blpol
LiquidCrystal_I2C lcd(0x27, 2, 1, 0, 4, 5, 6, 7, 3, POSITIVE); // Set the LCD I2C address

#define echoPin 7 // Echo Pin
#define trigPin 8 // Trigger Pin
#define LEDPin 13 // Onboard LED

int maximumRange = 200; // Maximum range needed
int minimumRange = 0; // Minimum range needed
long duration;
long distance; // Duration used to calculate distance

void setup() {
Serial.begin(9600);
lcd.begin(20,4);
pinMode(trigPin, OUTPUT);
pinMode(echoPin, INPUT);
pinMode(LEDPin, OUTPUT);

lcd.setCursor(0,0);
lcd.print("Range Finder");
lcd.setCursor(0,1);
lcd.print("Current Distance : ");
lcd.setCursor(7,2);
lcd.print("cm");

}

void loop() {
/* The following trigPin/echoPin cycle is used to determine the
distance of the nearest object by bouncing soundwaves off of it. */
digitalWrite(trigPin, LOW);
delayMicroseconds(2);

digitalWrite(trigPin, HIGH);
delayMicroseconds(10);

digitalWrite(trigPin, LOW);
duration = pulseIn(echoPin, HIGH); // Measures the length of a pulse on echoPin in microseconds
//waits for the pin to go HIGH, starts timing, then waits for the pin to go LOW and stops timing.
//Returns the length of the pulse in microseconds.

//Calculate the distance (in cm) based on the speed of sound.
distance = duration/58.2;

if (distance >= maximumRange || distance <= minimumRange){

lcd.clear();
lcd.setCursor(0,0);
lcd.print("Range Finder");
lcd.setCursor(0,1);
lcd.print("Current Distance : ");
lcd.setCursor(4,2);
lcd.print(distance);
lcd.setCursor(7,2);
lcd.print("cm");
delay(300);
digitalWrite(LEDPin, HIGH);

}
else {
lcd.clear();
lcd.setCursor(0,0);
lcd.print("Range Finder");
lcd.setCursor(0,1);
lcd.print("Current Distance : ");
lcd.setCursor(4,2);
lcd.print(distance);
lcd.setCursor(7,2);
lcd.print("cm");
delay(300);
digitalWrite(LEDPin, LOW);
}
delay(500);
}

Arduino – Week 2 – Stepper Motors

What is a stepper motor?

A stepper motor uses opposing electromagnets to create rotation. The different number of steps are determined by the number of poles on each the stator and the rotor.

https://www.elprocus.com/stepper-motor-types-advantages-applications/

There are several different types of stepper motor, depending on the use case and the size that is required. The main types are :

Permanent magnet stepper > These use permanent magnets in the rotor and electromagnets in the rotor, using attraction and repulsion to create rotation

Uses

Stepper motors can be used for all sorts of CNC controlled devices such as 3D printer or CNC routers.

Mechanical arms such as those used for assembly of cars etc will use stepper motors to obtain exact position repeatably

Any automated machinery that requires exact positions to be returned to, will use stepper motor as they are very precise int he increments of rotation that they can do.

How to drive a stepper motor

Wave forms that drive a stepper motor

Turning coils on and off > Transistors are electric dimmer switches which can be used as on off switches for stepper motors


Stepper Motors with Arduino – Getting Started with Stepper Motors

Stepper Motor Code

Setup code for the stepper motor initialises which pins are the outputs from the arduino

void setup() {

// initialize digital pin LED_BUILTIN as an output.

pinMode(13, OUTPUT);

pinMode(12, OUTPUT);

pinMode(11, OUTPUT);

pinMode(10, OUTPUT);

}

void loop() {
//STEP 1
digitalWrite(10, HIGH);
digitalWrite(11, LOW);
digitalWrite(12, LOW);
digitalWrite(13, HIGH);
delay(2);                                      // delay

//STEP 2
digitalWrite(10, HIGH);
digitalWrite(11, HIGH);
digitalWrite(12, LOW);
digitalWrite(13, LOW);
delay(2);                                      // delay

//STEP 3
digitalWrite(10, LOW);
digitalWrite(11, HIGH);
digitalWrite(12, HIGH);
digitalWrite(13, LOW);
delay(2);                                      // delay

//STEP 4
digitalWrite(10, LOW);
digitalWrite(11, LOW);
digitalWrite(12, HIGH);
digitalWrite(13, HIGH);
delay(2);                                     // delay

The loop will run through all of the bracketed coded indefinitely

delay(2) is the amount of ms left between that line of code and the next, which determines how fast or slow the motor will turn. The smaller the number, the faster it spins.

Arduino – Week 1 – Software Notes

Pulse Width Modulation


Using ‘unsigned char’ to replace values

> ‘unsigned char’ allows you to control all of the same variables in a sketch by only changing one value

unsigned char DelayTime = 255;
unsigned char LEDoutput = 2;

// the setup function runs once when you press reset or power the board
void setup() {
 // initialize digital pin LED_BUILTIN as an output.
 pinMode(LED_BUILTIN, OUTPUT);
 pinMode(LEDoutput, OUTPUT);
}

// the loop function runs over and over again forever
void loop() {
 digitalWrite(LEDoutput, HIGH);
 digitalWrite(LED_BUILTIN, HIGH);
 delay(DelayTime);
 digitalWrite(LEDoutput, LOW);
 digitalWrite(LED_BUILTIN, LOW);
 delay(DelayTime);
 DelayTime = DelayTime - 10;
 }